SLEEVE TUTORIAL- Setting Sleeves in the Round Method, SEWING

SLEEVE TUTORIAL- Setting Sleeves in the Round Method, SEWING

I said I would blog once a week so here I am again. Today’s post is a quickie “sleeve tutorial” with mainly pictures and few words. I’m using the “setting the sleeves in the round” method. This is just a refresher course for me when I need to sew sleeves again.

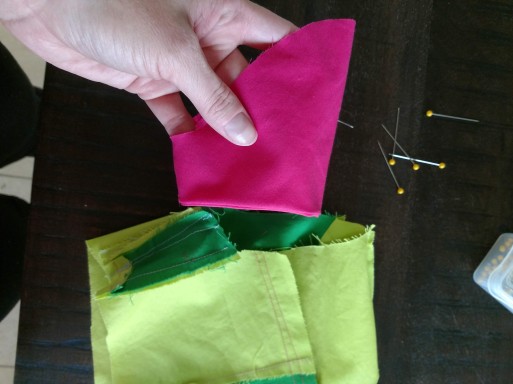
  1. Your sleeve will look kind of like this when you cut one of them out and sew an additional sleeve/lining onto it with right sides together. You’ll get an instant hem that you won’t have to sew later!

img_20190309_105127833-1

Next, fold the sleeve in half like this:

img_20190309_105133176-1


Pin your sleeve where you folded it in half. You will sew roughly along where you have placed the pin.

img_20190309_105202663-1

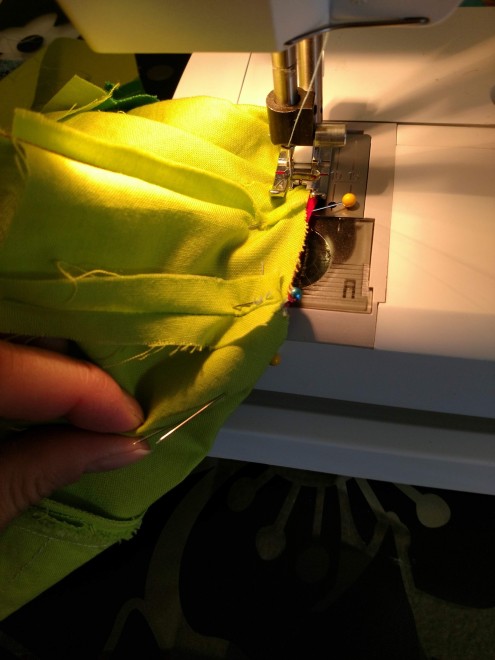
Sew it with your sewing machine like so:

img_20190309_105214033_hdr-1

Once sewn, it will look like this:

img_20190309_105410711_burst000_cover_top-1

You get the picture. Sew your other sleeve. They will look kinda like this when finished:

img_20190309_105551528-1

For some reason, this was the part where I always got all mixed up (spatially).

You will take the bodice part of your shirt/dress and turn it inside out. Next, take the RIGHT SIDE of one of your sleeves and slide them in the armhole, like this:

img_20190309_113459648

You will put it in all the way and then pin it to bodice like this: (yes, I know you’re supposed to “align the notches” but I didn’t have notches here, so doing my best without them):

It should look like this when you’ve finished pinning the sleeve to the bodice:

img_20190309_110559057-1

Then you’ll sew it like this with your sewing machine:

img_20190309_110825945_hdr-1

Here is another pic of sewing the sleeve to the bodice. You’ll sew all the way around:

img_20190309_110830934

You will turn your dress right side out and here is what the sleeve will look like.

img_20190309_111207978-1

All done.

I sewed 2 GREEN Dresses for under $6.00! HAPPY GREEN MONTH!

I sewed 2 GREEN Dresses for under $6.00! HAPPY GREEN MONTH!

Blogging is difficult for most of us because you have to come up with different things to post, REGULARLY. Blogging favors people who are constantly inspired and effortlessly creative. Those are the blogs that more frequently pop up on Google’s first page. These are the ones that we return to again and again to see “what’s new”. I’ve been too infrequent lately.

Lately I’ve hit a low point in my sewing ambitions. In my attempt to sew leggings/yoga pants/gym pants (whatever you call them), there was a big fail. I didn’t use a pattern. I tried to use an old pair of pants as a template and that didn’t quite work. Let’s just say that a bunch of black knit fabric (which tends to be expensive) ended up being wasted due to my ineptitude. I know.  I’ll find a way to incorporate it into something else.

On the bright side, it’s green month. I’ve found some green things that I’ve made and sewn and I’d like to share them with you here on my blog.

One of the things I’ve been doing lately is scouring thrift stores for old sewing patterns. Most of the time I can find them half off of .49 cents, which means I can find old sewing patterns for .25 cents each! 

img_20190219_190218657

With the pattern above, I was able to make something I’m calling “Renee’s Lime Dress”, for less than $5.00 (this includes the fabric I bought at Walmart and the zipper that I got on sale at Joann’s.) Yes, I thought up the color scheme and added the limes. Below you’ll find a picture without the limes (it might be too loud for some of you). I thought the belt and necklace were nice additions.

img_20190219_174645408

And here is the “less loud” version of the dress, sans limes. I like both of them and very pleased with the CHEAP, EASY pattern I found!

img_20190218_152357208

What does the back of my green dress look like? I’m still working on zipper installation techniques.

img_20190218_151416140-1


But what to do with the leftover pieces of green and lime green fabric?????? I sewed it all together almost like a quilt sheet. I used every single scrap of leftover green material from my dress above and sewed it into one big, random block. Now I will use this material to make a little girl’s dress.

img_20190308_125857199

And here goes:

And the finished result with pink sleeves and a pink peter pan collar? Well it can’t be perfect when you’re using a block of randomly sewn leftover fabric together. But hey, it’s fun! And here is a “setting sleeves in the round” tutorial, if you’re a visual learner and would like to see how I made and “set in” the sleeves. (Note, this tutorial is actually for me to refer to).


CABBAGE STEW RECIPE

And how about some Liberian Cabbage stew, since it’s green month?

We used this recipe but omitted the maggi bouillon cubes (used our own seasoning combo as seen below) and only used chicken instead of the 3 forms of meat typically required for this African recipe.

Liberian Cabbage Stew Recipe

Always cook a pot of rice to go with your stew. And for the love of god, don’t use a rice cooker!! This isn’t rocket science, all you need is a pot.

img_20190315_184355396_hdr

When the stew is all cooked it will look red because of the tomato paste. It tastes really delicious and is fairly healthy, all things considered.


HAPPY GREEN MONTH! HAPPY ST. PATRICKS DAY!

Quinoa Chocolate Chip Cookies (with Other Healthy Ingredients!)

Quinoa Chocolate Chip Cookies (with Other Healthy Ingredients!)

Do you ever have a craving for something sweet, has a decent amount of protein, and is (kinda) healthy too? Well, I’ve been making these healthy cookies for over a decade and I just can’t stop. They satisfy all my requirements of sweet, protein, and satisfying.

Warning: These chocolate chip cookies may not be for everyone, I’ve never known anyone who wants to try my cookies. But I love them, and so do my children.  And that’s all that really matters to me. Since they’re pretty healthy, I tend to overeat them.

Between 2006 and 2010 I worked at a little health food store. I learned all about a variety of interesting ingredients. That’s when I invented this recipe, except then I was using hazelnuts and walnuts with the other ingredients and no quinoa. I’ve always loved their nutty, earthy flavor that pairs nicely with the taste of semi-sweet (or dark chocolate) chocolate chips.

I often use random leftovers like cooked quinoa which goes right into the batter.

img_20190212_190936236

Or, if I have a few crumbs left in a bag like this, I toss them in before throwing out the bag:

img_20190212_190339864

White flour too! No matter what, my chocolate chip cookies will ALWAYS have my favorites: flax seed meal, wheat germ and at least 1 cup of finely chopped up walnuts. Also, finely ground up hazelnuts are AMAZING in this recipe! WAY better than almonds! 

img_20190212_190258440

And throw everything into your chocolate chip cookie batter.

Healthy Cookie Batter:

img_20190212_191154320-1


Always have your helper boy beside you, he can offer suggestions and tips during the cookie making process.


The finished result:

img_20190212_195545978-1


MY RECIPE

img_20190301_191614009