20 Minute “like new” Ottoman

20 Minute “like new” Ottoman

The other day I came across this ottoman at a thrift store. It was $10. Decided to buy and reupholster.

img_20190922_102750013


img_20190928_133752239


img_20190923_160703318


img_20190924_104717543


img_20190924_104720234


img_20190924_110326610_hdr

All done! Clean new fabric.

Please excuse my crazy paintings on the wall (the highest one up isn’t mine, bought at a Flea Market in Krakow, Poland-the other two are mine).


My Vinyl Wasn’t Final

My Vinyl Wasn’t Final

You may have remembered when I had a couple vinyl chair that looked like this:


These were rather dirty vinyl chairs from the 1960’s. They were airport terminal chairs that came from France. Together they cost me 70 euros at an antique store in Germany. Also, the board which the cushion was sitting on was particle board that was crumbling apart, as pictured below.

My father cut me a couple new boards for the cushions to rest on. Instead of particle board that was 60 years old and disintegrating, he used ply wood like this:

img_20190420_120623685-1

I changed the vinyl to look like this (my first upholstery attempt). My first attempt at sewing with vinyl too. You may remember when I blogged about it here: Vinyl Chairs My First Try


But I realized that I actually really liked the original white look of the chairs so I went and bought white vinyl and started the process again.

img_20190418_091230631_hdr

And I did both chairs this time in white vinyl. Slightly different pattern.

img_20190418_210859970

And I did the other chair in the same original style but with a seam down the middle to effectively use my vinyl without having to purchase more, if you know what I mean. I button tufted the seat cushion (first attempt at button tufting too!). I can’t wait to do more button tufting!

img_20190620_105304603_hdr

And here they are together with some semi-cute pillows I sewed.


I sewed 2 GREEN Dresses for under $6.00! HAPPY GREEN MONTH!

I sewed 2 GREEN Dresses for under $6.00! HAPPY GREEN MONTH!

Blogging is difficult for most of us because you have to come up with different things to post, REGULARLY. Blogging favors people who are constantly inspired and effortlessly creative. Those are the blogs that more frequently pop up on Google’s first page. These are the ones that we return to again and again to see “what’s new”. I’ve been too infrequent lately.

Lately I’ve hit a low point in my sewing ambitions. In my attempt to sew leggings/yoga pants/gym pants (whatever you call them), there was a big fail. I didn’t use a pattern. I tried to use an old pair of pants as a template and that didn’t quite work. Let’s just say that a bunch of black knit fabric (which tends to be expensive) ended up being wasted due to my ineptitude. I know.  I’ll find a way to incorporate it into something else.

On the bright side, it’s green month. I’ve found some green things that I’ve made and sewn and I’d like to share them with you here on my blog.

One of the things I’ve been doing lately is scouring thrift stores for old sewing patterns. Most of the time I can find them half off of .49 cents, which means I can find old sewing patterns for .25 cents each! 

img_20190219_190218657

With the pattern above, I was able to make something I’m calling “Renee’s Lime Dress”, for less than $5.00 (this includes the fabric I bought at Walmart and the zipper that I got on sale at Joann’s.) Yes, I thought up the color scheme and added the limes. Below you’ll find a picture without the limes (it might be too loud for some of you). I thought the belt and necklace were nice additions.

img_20190219_174645408

And here is the “less loud” version of the dress, sans limes. I like both of them and very pleased with the CHEAP, EASY pattern I found!

img_20190218_152357208

What does the back of my green dress look like? I’m still working on zipper installation techniques.

img_20190218_151416140-1


But what to do with the leftover pieces of green and lime green fabric?????? I sewed it all together almost like a quilt sheet. I used every single scrap of leftover green material from my dress above and sewed it into one big, random block. Now I will use this material to make a little girl’s dress.

img_20190308_125857199

And here goes:

And the finished result with pink sleeves and a pink peter pan collar? Well it can’t be perfect when you’re using a block of randomly sewn leftover fabric together. But hey, it’s fun! And here is a “setting sleeves in the round” tutorial, if you’re a visual learner and would like to see how I made and “set in” the sleeves. (Note, this tutorial is actually for me to refer to).


CABBAGE STEW RECIPE

And how about some Liberian Cabbage stew, since it’s green month?

We used this recipe but omitted the maggi bouillon cubes (used our own seasoning combo as seen below) and only used chicken instead of the 3 forms of meat typically required for this African recipe.

Liberian Cabbage Stew Recipe

Always cook a pot of rice to go with your stew. And for the love of god, don’t use a rice cooker!! This isn’t rocket science, all you need is a pot.

img_20190315_184355396_hdr

When the stew is all cooked it will look red because of the tomato paste. It tastes really delicious and is fairly healthy, all things considered.


HAPPY GREEN MONTH! HAPPY ST. PATRICKS DAY!

FELT IS SO FUN!!!! HOW TO USE IT?

FELT IS SO FUN!!!! HOW TO USE IT?

For a while now I have been experimenting with felt and its sundry uses. You know, that plush, soft, fuzzy stuff that is made from PLASTIC BAGS??!! YES! RECYCLED PLASTIC BAGS! You can get it in sheets at your local fabric store or even places like Michaels, Walmart or Hobby Lobby–usually $1-$1.50 per sheet. I buy a ton when it goes down to 50 cents a sheet at Joann Fabrics.

It looks kind of like this. Always keep a bag of cut-up scraps. Also, have your glue gun handy. This is how I attach cut felt pieces together.

img_20180304_113550829_hdr

Felt is bright and colorful. It’s durable and fun to cut up and use! You can sew it on things. (I cut up my husband’s old shirts and turn them into boy shirts). I finish them off with felt appliques that I design, cut out and sew on. Here are 3 (toddler) boy shirts I made from scratch this week.  2 of them have felt applications. You can see my felt elephant and palm tree.

img_20190131_114309587

You can also make a FELT BOARD as I like to call it. It reminds me of the flannel graph board that was used by missionaries and in Sunday schools in the 70’s and 80’s. I took an old canvas and covered it with the non-slip stuff that you put under rugs. This non-slip material was being stored in a closet and not being used….so why not?

img_20180304_112643423_hdr

Then you staple it on a canvas or board and put a bunch of velcro pieces on it. Children who haven’t watched a ton of television like to stick the felt pieces on the board and make up stories.

img_20180304_113122846

Like this:

img_20190201_141920415

You can also make your own fun felt books as I have here:

Felt is so much fun! Cutting it out and making your own creations with a glue gun is one of my favorite things to do. Bonus: the kids get a new thing to play with!


I Reupholstered An Accent Chair with MY MODERN MAJESTIC DESIGN (SEWING INVOLVED!)

I Reupholstered An Accent Chair with MY MODERN MAJESTIC DESIGN (SEWING INVOLVED!)

After two glasses of Port I think I’m a bit uninhibited and so I’m blogging again….You have two options: A. Leave or B. Forgive me

I keep mentioning that I’m going to reupholster old chairs I got at a flea market in Germany.

A couple years ago I bought BOTH of these lovely button tufted accent chairs for $70 at the American Ramstein Airforce base. What a terrific deal! As you can see here, chairs of this nature are not cheap: I was told that they were airport seats from France circa 1960. Waaaait whaattt? French airport seats from 1960?!? I fell in love.

img_20180413_174454232_hdr

But the vinyl has started to break down in places and become very dingy–even spray paint would not fix it :(.  Be careful when spray painting vinyl, it can leave a sticky, (nearly) permanent residue as it binds to the material. The particle board underneath the vinyl was literally starting to crumble apart.


I decided to embark upon another reupholstery venture, at least for one of the chairs. This time, it would be more challenging as I would need to sew the vinyl covers for the chairs. I would also need to cut out new pieces of wood to affix to the foam (thanks Dad!); particle board doesn’t last forever.

Make sure to cut off all the vinyl pieces neatly so that you can re-use them as your pattern. I decided to use a bunch of extra blue vinyl left from my previous chair project that you can see here.


Cut out your new vinyl using your old vinyl as a template. I’m just using vinyl scraps that I had from my previous project (so I didn’t purchase any new materials for this project).

It turns out that sewing coverings for chairs is akin to sewing clothes. Sewing the sides of the chair is almost like sewing sleeves. NOT FUN:

I want to be honest. This was one of the most difficult sewing tasks I’ve yet attempted. YOU KNOW HOW HARD IT IS TO MAKE A PIECE OF MATERIAL FIT SNUGLY TO SOMETHING ELSE? At one point I started to re-do my project. I decided to add in a couple stripes of another color of vinyl (teal) to my chair to give it a bit of flair:

img_20181010_151159131

I won’t bore you with the details–this chair was a REAL struggle. Finished results are here:

It’s the chair with the book perched on top of it. It offers some exquisite modern beauty to our living room: I’m so proud of my striped vinyl design–all from scraps!

img_20181013_110011720_burst000_cover_top

And what to do with some of the extra scraps of vinyl lying around? Attempt to make a purse, of course!

img_20181018_102711107

Yes! I still need to reupholster the other chair. To be continued…

We have a big paint job coming up and I will share the details for that too. All of those salmon colored walls in our living room? We’re turning them white.


I MADE A SUMMER TANK TOP (AND A YELLOW SKIRT TOO!)

I MADE A SUMMER TANK TOP (AND A YELLOW SKIRT TOO!)

I think it was Jordan Peterson who said, “Compare yourself to who you were the day before, not to who someone else is today.”

Learning to sew clothes has been a trial and error process–but I’m learning to compare my sewing to how I was sewing a few weeks ago…a few years ago. I’m terrible with spatial cognition. I don’t see things very quickly. My visual processing speed is delayed (compared to others) and my mind has a hard time manipulating objects in space and considering alternative, yet accurate positions.

Sewing has been a rough pursuit but it’s EXACTLY WHAT I NEED. I need to have some outlet for strengthening these intellectual capacities. Even better, I get to meld my penchant for creativity and art with this hobby. I don’t think there is any activity that gives me more FLOW than attempting to SEW. Sorry. Bad rhyme.

It’s the designing part that really draws me in. Attempting to design a piece of clothing and then sewing it. Ahh, nothing feels quite like it–especially when I get it roughly right. Painting is a close second.

I’m realizing that I need to take more risks with design and sewing. I often worry that “I’ll be wasting fabric”, so I hesitate to try something. It’s super easy to mess up! I’ve done it repeatedly even when making a fastidious effort to follow instructions.

If I go all the way off the tracks, can’t I expect to have a mess on my hands and fabric that will end up becoming pillow stuffing? YES. But compared to nonexistence, making mistakes is BLISSFUL!

I’ve started to get more creative and worry less about my final product. I work with what I have–mistakes and all, and try to come up with something. So far, I’m figuring things out.

I was having THE MOST DIFFICULT TIME with this TANK TOP that I designed. It would be the first shirt/tank top I have made for myself. I made enough mistakes to call it quits. I kept adding on and cutting and changing things around.

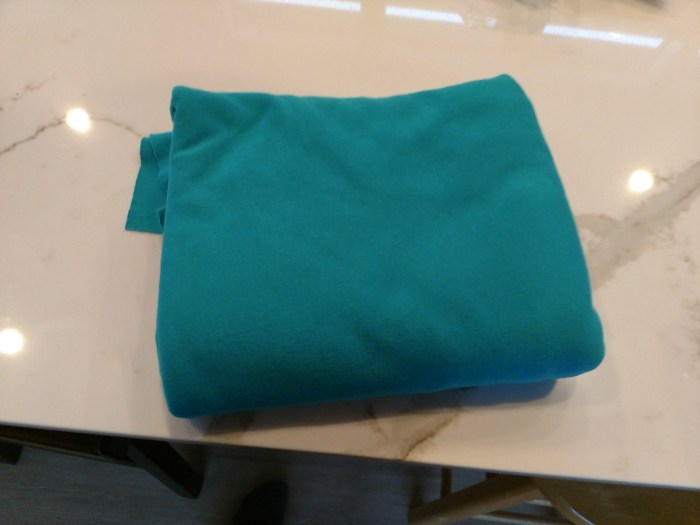
I used a knit fabric and here is where I started. I also added some teal knit fabric to it because the tank top WAS TOO SHORT.

img_20180415_191709718

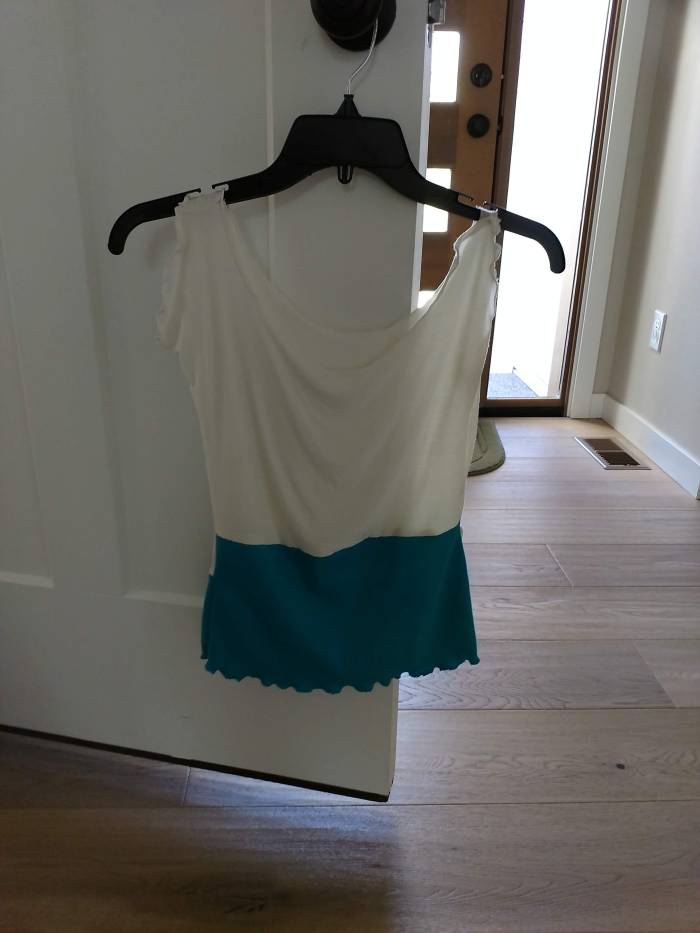
And here is my final result! I zig zag stitched the edges around the tank top and a ruffle emerged! INSTANT FASHION!

If you look closely (or maybe even from a distance) you’ll notice its asymmetric. Not on purpose of course, but I’m pretending it was intentional. You can see how the sleeves/shoulder straps (or, whatever you call them) are of different widths.

Not gonna lie, I LOVE IT! IT FITS PERFECTLY. Then again, you’ve got to be pretty bad if you can’t fit into a knit!

I’m just so pleased with it, especially considering how it was looking beforehand, how I didn’t use a real pattern…I just pulled it out of no where. Adding that extra strip of teal fabric from my stash not only added to the length–which I desperately needed–but gave it a fashionista look.

img_20180725_1141072591

To think I almost threw out this wad of fabric, but I kept going with it, kept playing around.

I’m so happy I kept playing around with it! It fit perfectly–as knits have lots of stretchy give to them. Perfect for hot summer.
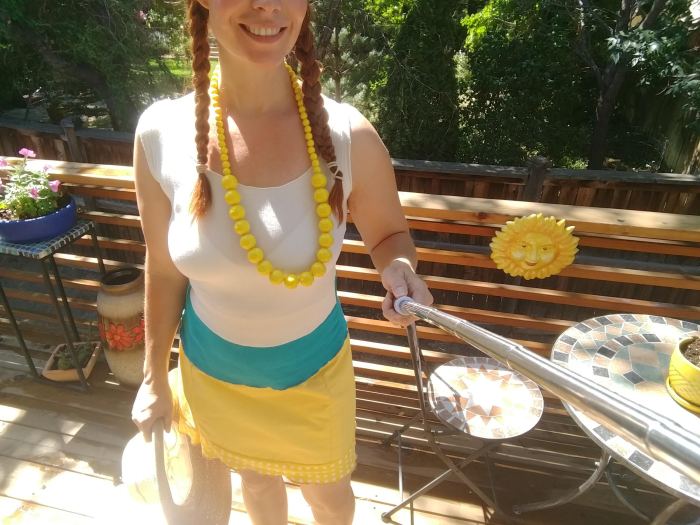
Here is some cheap fabric that I bought from Walmart. I had pieced it together–almost like pillow cases and then started to randomly sew. I didn’t know what I was doing here. I thought, why not sew it all together and form it into a skirt?

img_20180603_175203026

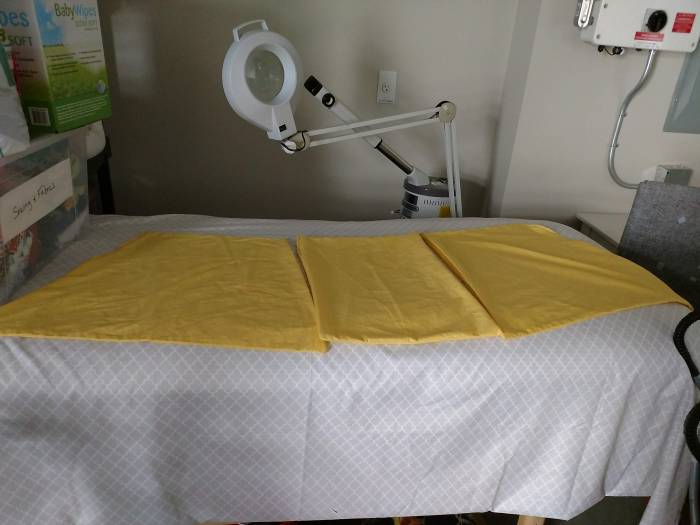
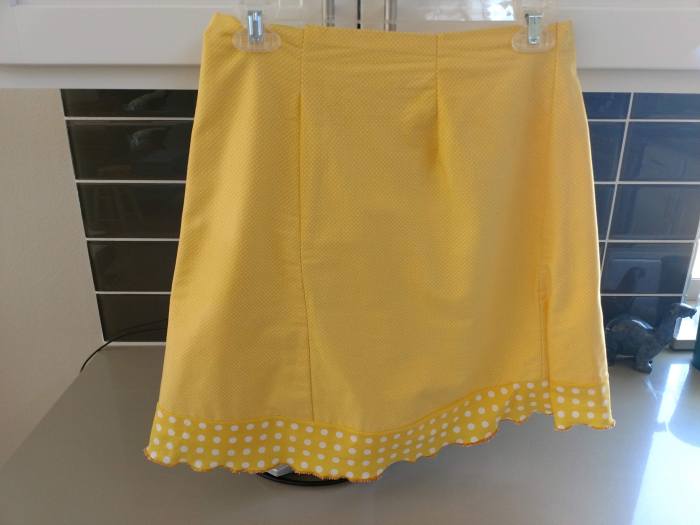
And here is my final skirt result after MANY CHANGES. It was tough to get it just right! I installed a long, 7 or 8 inch zipper in the back and lots of random, off-kilter darts. But who cares? Notice that I added a piece of fringe polka dot fabric on the bottom for extra flair and zig zag stitched the edge! Still, a very simple look.

The trick to making a skirt is wrapping some fabric around your waist and then going from there. That’s all I do. Once you have a rough idea of how much fabric you’ll need for your size, you just start sewing. Towards the end you decide…do I want to add a top waist placket? Do I want to add a zipper or elastic? You can make those decisions later.

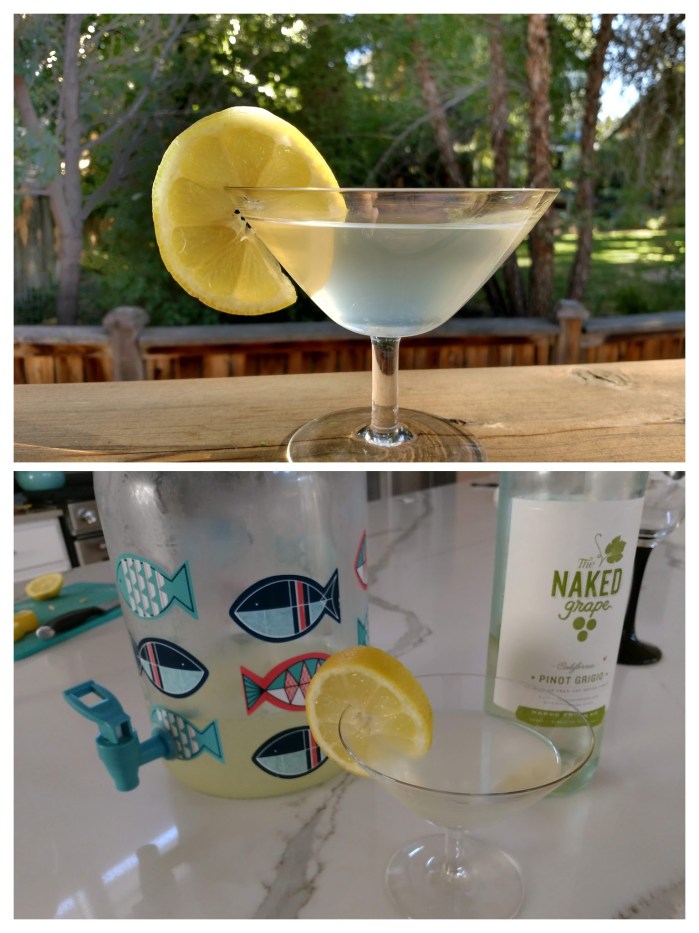
The best part? It FITS PERFECTLY! Hello Summer. I feel like I should be behind a Lemonade Stand or something.


img_20180725_1428336392

How about some homemade lemonade spiked with some Pinot Grigio? Chilled white wine is PERFECT for a summer evening on your porch with your Kindle. I’m still trying to finish Ben Sasse’s book “The Vanishing American Adult”.

img_20180727_181006940-collage

The key to sewing is not being discouraged by Nazi seamstresses who keep insisting that “There’s only one way to do it”. 

Keep trying and keep thinking up creative combinations. You don’t have to follow someone else’s script. You’ll improve with measurements and sewing machine accuracy eventually–but let that go for now! Put your focus on the fun part–THE DESIGN! It will motivate you to keep going!

img_20180725_1515156643