Blogging is difficult for most of us because you have to come up with different things to post, REGULARLY. Blogging favors people who are constantly inspired and effortlessly creative. Those are the blogs that more frequently pop up on Google’s first page. These are the ones that we return to again and again to see “what’s new”. I’ve been too infrequent lately.
Lately I’ve hit a low point in my sewing ambitions. In my attempt to sew leggings/yoga pants/gym pants (whatever you call them), there was a big fail. I didn’t use a pattern. I tried to use an old pair of pants as a template and that didn’t quite work. Let’s just say that a bunch of black knit fabric (which tends to be expensive) ended up being wasted due to my ineptitude. I know. I’ll find a way to incorporate it into something else.
On the bright side, it’s green month. I’ve found some green things that I’ve made and sewn and I’d like to share them with you here on my blog.
One of the things I’ve been doing lately is scouring thrift stores for old sewing patterns. Most of the time I can find them half off of .49 cents, which means I can find old sewing patterns for .25 cents each!
With the pattern above, I was able to make something I’m calling “Renee’s Lime Dress”, for less than $5.00 (this includes the fabric I bought at Walmart and the zipper that I got on sale at Joann’s.) Yes, I thought up the color scheme and added the limes. Below you’ll find a picture without the limes (it might be too loud for some of you). I thought the belt and necklace were nice additions.
And here is the “less loud” version of the dress, sans limes. I like both of them and very pleased with the CHEAP, EASY pattern I found!
What does the back of my green dress look like? I’m still working on zipper installation techniques.
But what to do with the leftover pieces of green and lime green fabric?????? I sewed it all together almost like a quilt sheet. I used every single scrap of leftover green material from my dress above and sewed it into one big, random block.Now I will use this material to make a little girl’s dress.
And here goes:
And the finished result with pink sleeves and a pink peter pan collar? Well it can’t be perfect when you’re using a block of randomly sewn leftover fabric together. But hey, it’s fun! And here is a “setting sleeves in the round” tutorial, if you’re a visual learner and would like to see how I made and “set in” the sleeves. (Note, this tutorial is actually for me to refer to).
CABBAGE STEW RECIPE
And how about some Liberian Cabbage stew, since it’s green month?
We used this recipe but omitted the maggi bouillon cubes (used our own seasoning combo as seen below) and only used chicken instead of the 3 forms of meat typically required for this African recipe.
I’ve found myself so busy with everyday life that I decided to stop doing Facebook. What do I mean? I mean, I decided I needed a break. No. I wouldn’t use it that much, just when breastfeeding. I would stop scrolling through all the posts and reading comments and getting agitated or curious.
I really do like any post that makes me think or inspires some sort of thoughtful cognitive application. I love being involved in clarifying discourse. I like the smart people on Facebook who fight battles with their intellect and knowledge. I like being the spectator. I enjoy posts that prick at me, or bother me, and I like ones that inspire me too. I really love them all–(except memes with cute animals or any uncreative “reshare” post.)
BUT….this was taking WAY too much time and removing me from things that I wanted to accomplish, like blog, write, sew, bake, paint… work on my online course–anything more productive that Facebook.
The list of things I want to try grows by the day and I find myself overwhelmed with ideas and unable to tackle any of them. Having two children is great because it really gets you thinking of all the things you could be doing or learning–meanwhile, I’ve got a bucking bronco and I’m trying to change his diaper as he runs off screaming mid-diaper change EVERY SINGLE TIME.
On this blog I like to post what I’m doing; what I just whipped up–even if it’s a bit boring or “imperfect”. What else are you going to blog about if you can’t fit it into your “everyday happenings”, right?
With Valentine’s Day coming up very soon, I thought I’d share a pic of a cake I recently made.
This is a simple little Valentine’s Day Cake. I thought this one up but I’m sure there are a million similar versions out there.
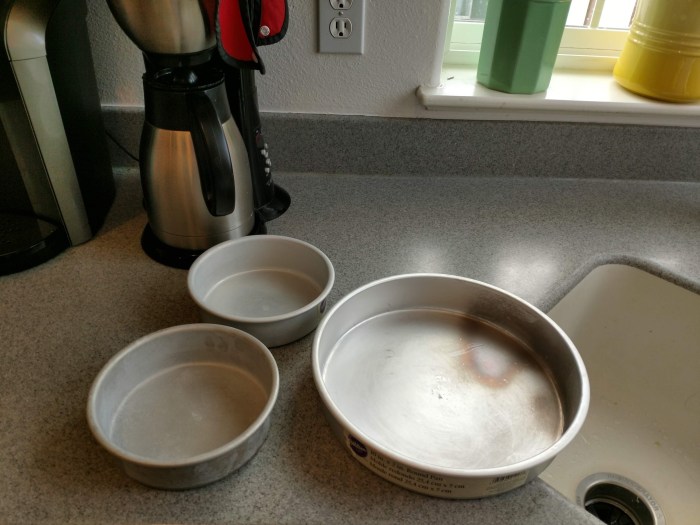
Instead of using a big cake pan (like the big one pictured below) I used the two little ones.
I used the recipe off the back of this Hershey’s Cocoa powder box:
Very easy.
Once the chocolate cake was baked and cooled in the fridge, I whipped up a chocolate ganache (there are a million recipes on the internet). I just used the ones with heavy whipping cream, chocolate chips and light corn syrup.
I made a raspberry filling. I cooked up red raspberries in a little pot with a squeeze of lemon juice and some sugar and corn starch.
Then I made a little raspberry heart shape on the top of the ganache (once the ganache had hardened).
Let your imagination take you away this Valentine’s Day!
Alright, so just a quickie here. Nothing too exciting.
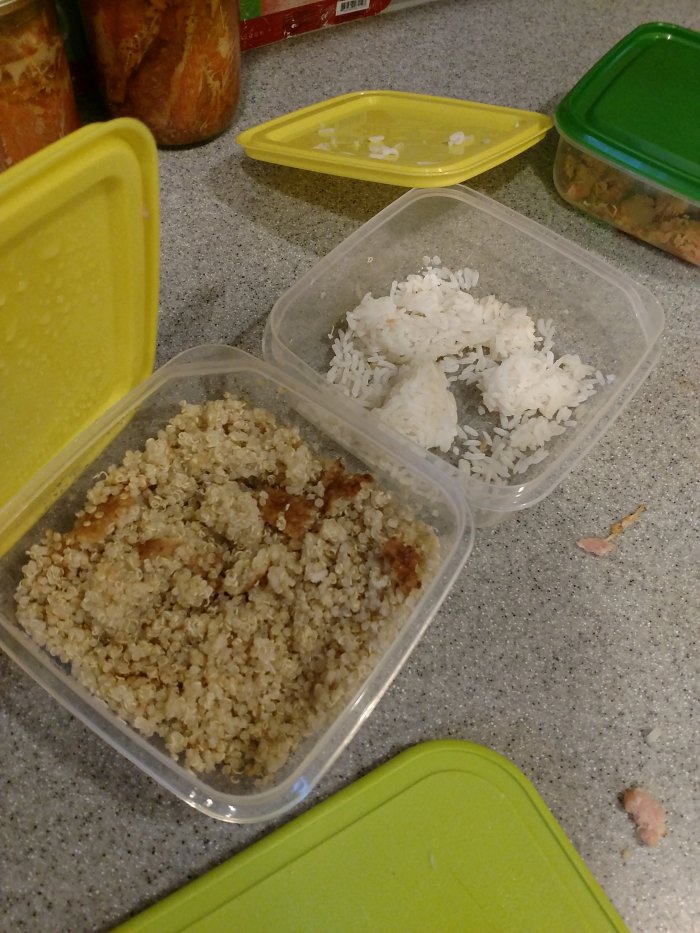
Do you ever have 1,2…3 day old rice or quinoa in your fridge and you’re not sure what to do with it? You feel bad about wasting it so you just let it sit there, but then you eventually toss it out. Or…you make unhealthy fried rice.
That’s what I’ve always done. It gets kind of stale and sometimes the birds will eat it if I season it correctly.
What if I could just eat it? I’m always a sucker for trying things that save money.
Maybe, one day when you’re good and brave like me, you can revive it…transform it into Jambalaya or West African Jolof Rice.
My family *DOES NOT* like this kind of food, but I happen to LOVE it;
so here goes..just for my taste buds.
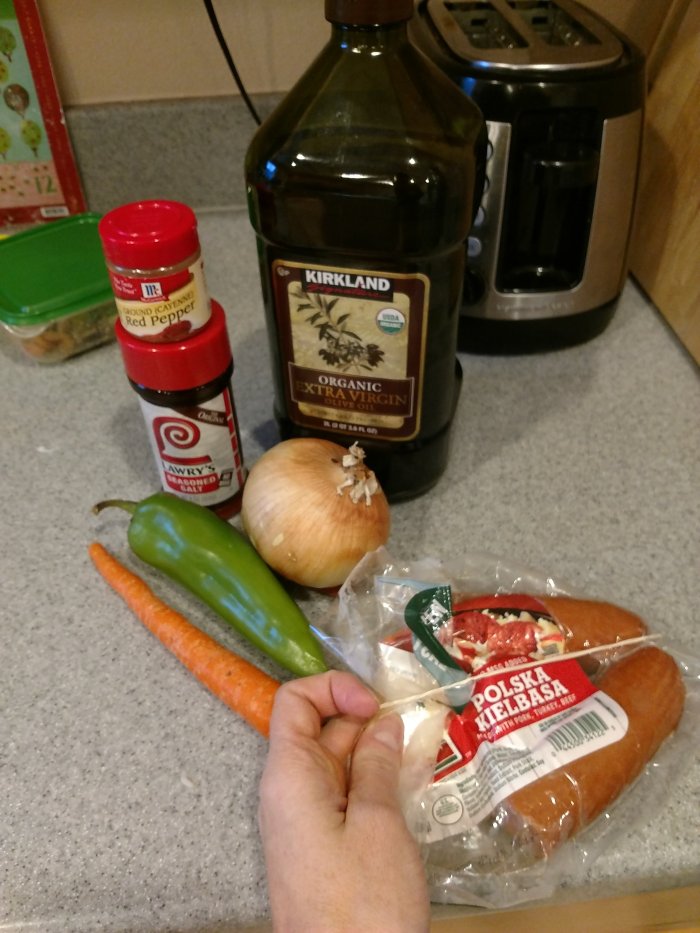
So grab some of the ingredients pictured below. These are what I had on hand…(oh, and maybe a slice of bacon or two and some extra diced tomatoes sitting in your fridge if they happen to be there..). It’s really not a big deal.
On the stove, heat your olive oil on medium-low. Add your diced up Anaheim chili pepper, diced onion and grated carrot. Saute a bit.
Toss in some diced up sausage and/or bacon. Sprinkle seasoning. Throw in your refrigerated leftover rice and/or quinoa (I used both). Sprinkle olive oil into the mixture as it Cooks on the stove top.
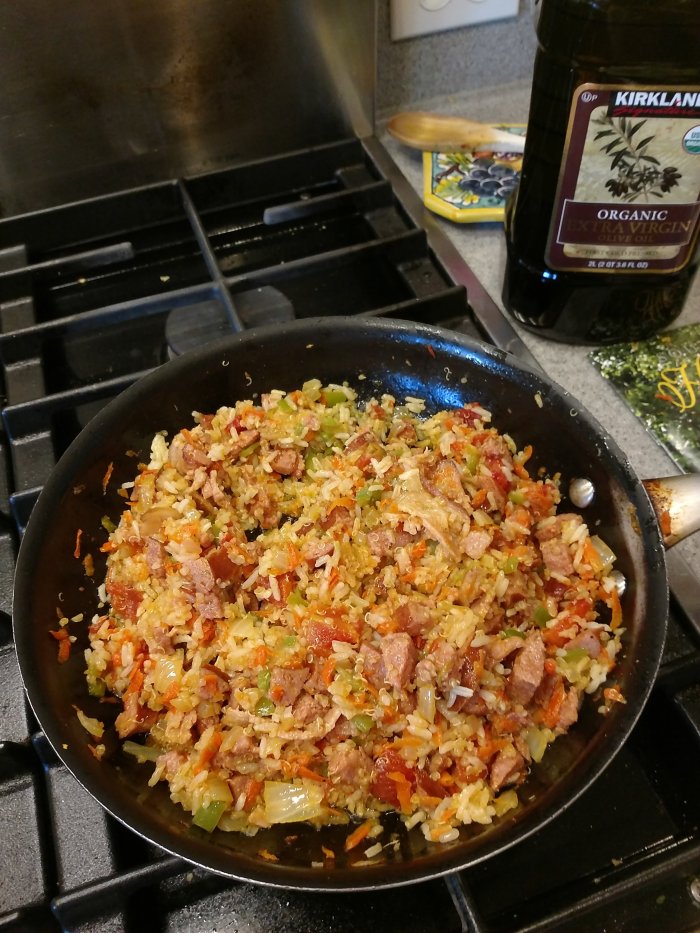
Super easy and done!
A plate full of Jambalaya from OLD rice and Quinoa. Hey, it actually tasted fine. But even better? It was healthier than some other options and I used everything that I already had on hand.
Don’t eat the rice past a few days.
If you want to transform older rice into a Jolof-style, you can add a tablespoon or two of tomato paste into the olive oil as it’s cooking/almost beginning to fry/just getting hot.
Once you cook the tomato paste in the oil for a minute or two, add the leftover rice or quinoa and add a sprinkling of water. (You have to experiment as it depends on how much leftover rice you have–so go easy on the water– and you don’t want it to turn soggy, just slightly moist and revived.) You can add veggies that you have cooked in another pot or sauce pan to the red/Jolof rice. You can add fried meats or fish too.
No. It’s not gonna taste like the authentic Ghanaian Jolof rice, or the Thieboudienne (red rice and fish) from Senegal. But it works if you’re in a pinch for dinner.
“You are not in a contest with other people, you are in a contest with yourself. Every day find ways that you can improve yourself–your character, your efforts, your knowledge, your creativity, your ambitions…your emotions.” –(me–quote from me today)
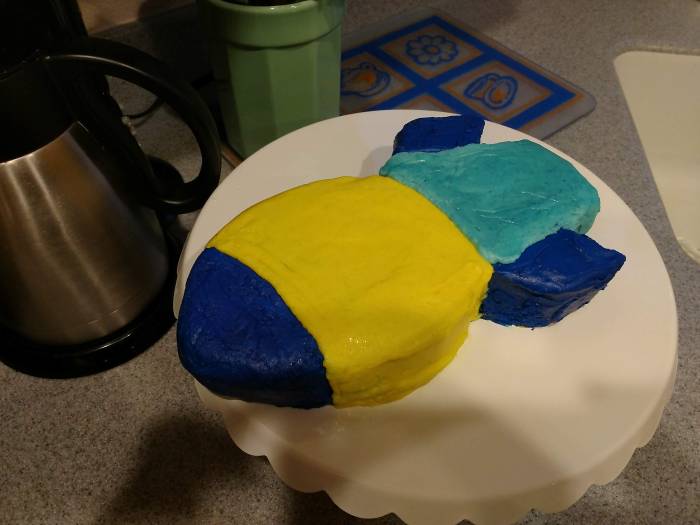
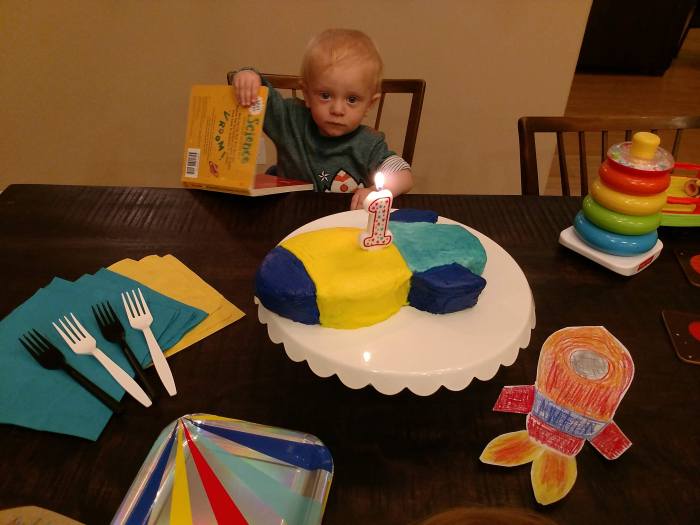
For my son’s first Birthday, I wanted it to be extremely simple and cheap (use what I already had on hand) but also have some fun and bright memories (and pictures) for future years.
If you’re not into children’s movies/cartoons/videos/characters what to do for a Birthday? I’ve found that a good (and extremely cheap) way to create a “Birthday Party Theme” is to look around your house and take account of toys and books that you already have.
No, I do not go onto the internet first “to look for ideas”. In fact, I highly discourage it because you’ll be intimidated by all the amazingly perfect creations put forth by other experts. You’ll either decide not to do anything–for fear that it will be a failure or you’ll be tricked into thinking that you have to spend a bunch of money “to get the right look”. (I’ve probably been on Pinterest less than 10 times in my entire life! No kidding).
Also, this isn’t very creative is it? The point is, COME UP WITH THE IDEA IN YOUR OWN MIND FIRST and, if you absolutely have to, start surfing around the internet because, say, you forgot the recipe for the frosting you have in mind. You get the picture.
What are a bunch of things already at your fingertips that you can extract a theme from? For us, it was space-related things. Mind you, we only had a couple things in this category, but I thought it would be fun to create a tiny little First Birthday Party for my son along this genre. It would just be our family, of course, since we don’t have any relatives or friends here in Alaska.
I didn’t want to buy a cake; but I did want to experiment with another homemade cake that you form into something related to the theme. After all, I had all the ingredients on hand and it’s more baking practice for me.
This time, I chose a rocket ship. I used the same white cake recipe I’ve used in the past–extremely boring and not the best flavor in the world–but SUPER EASY TO WORK WITH. You can find it on an earlier blog post of mine called “Pagan Party For Kids” or “My Robin’s Easter Egg Cake”.
Once baked and cooled in the fridge in plastic wrap (overnight), I pulled it out and cut the cake into a rocket ship using a template I made from paper.
And I did a quick frosting job here. No, that’s not fondant, it’s just powdered sugar, butter, milk and vanilla frosting that has been tinted.
With a cake like this, we will be flying to the moon in no time.
I also made a couple little rocket ships from cereal box cardboard.
Our Baby having his first Birthday!
Everything pictured here are things that I already had on hand. I didn’t buy a single thing. Even the Birthday candle was my daughter’s when she turned 1! Remember the old phrase, “Reduce, Reuse, Recycle”. Birthday presents were sent to us from Grandma and Grandpa and Auntie, of course.
Ahh, so you’re back to check out my blog! Thanks for showing some interest. This time, I’ll take you on a brief recap of our LONG DRIVE from central Oregon all the way to Alaska.
I can’t believe that we are starting a new life in another world. I only wish I could have had the time to go over our journey in detail– and describe it to you to accurately capture it’s magnitude.
We traveled for over a week. Our road trip began in Central Oregon and ended in Alaska. Below: Our trip started out in dry, central Oregon. Here is our darling Clementine–just past the Ghost Town of Shaniko. Wheat fields begin to emerge.
For 7 days we stayed in motels, hotels and lodges in Washington state, British Columbia, the Yukon and finally, Alaska.
As a child I would think of the northern Washington border as where the land ended. It was a fuzzy, almost invisible place in my mind. You can imagine my surprise when we crossed the northern Washington border into another country– Canada–and entered into the Grand, seemingly endless expanse of British Columbia!
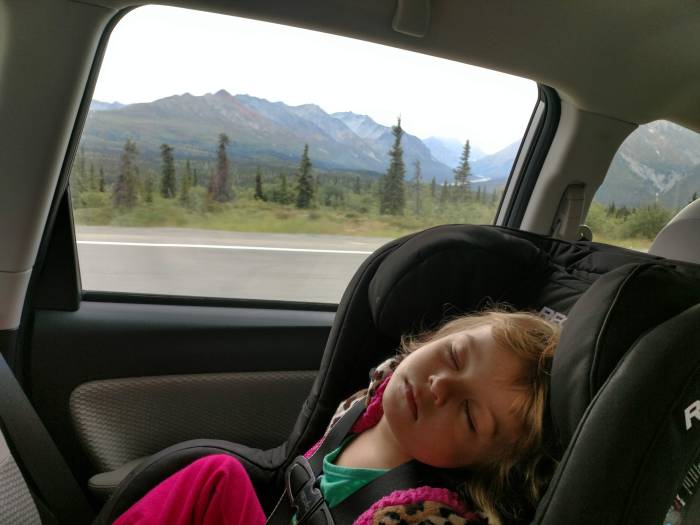
We were lucky to have my parents come along for the journey. They helped with the looooong days of driving both our vehicles–with a screaming 10 month old in the backseat (sorry Dad!) and a demanding 2 1/2 year old in the other one.
One of the things you’ll notice about Canada is that once you cross the border–everything appears more orderly…less sprawling. Space seems to be used and conserved more neatly. Even the people are in better shape. I didn’t realize how many vineyards there were in British Columbia! Remember to turn on your headlights when driving in Canada–even during the daytime.
You’ll notice two prominent fast food chains that seem to pop up in every city–Tim Hortons and A&W. We shuddered when we heard the locals refer to Tim Hortons as “Timmy’s”; of course, they could have referred to it as “Horty’s” which would have been even worse. It’s a coffee-bagel-doughnut-sandwich shop all rolled into one that the Canadians seem to be quite proud of.
If you aren’t aware, Canadians frequently use expressions like these:
1. You Betcha’
2. Oh
(Fun Fact: Like Canadians, Liberians are another group of people who use the expression “Oh” and attach it to the end of some sentences to add emphasis and drama).
3. Whenever the word “out” was used, it sounded more like “oat”–as in Quaker Oats.
Kelowna, British Columbia.
This place would have been SURREAL had it not been for the cloaking of smoke that suffocated the entire province during our travels.
If you have a chance, type the words “Kelowna, BC” into Google. You’ll be shocked that such a gorgeous city exists–and you never even heard about it. There is an incredible lake in Kelowna with beaches, docks and scenic boatyards. A park wraps around a section of the lake just walking distance from downtown. There you’ll find resplendent flower beds like these.
Kelowna is cute–and tight–with a sufficient population to make you feel like “You’re in the big city”. I hear that this lovely Canadian city is GROWING–one of the fastest growing cities in Canada. I’m sure on a sunny day you can see the beautiful city with the lake in its fullness and the vineyards that surround it in the distance.
I met a couple amicable bums in Kelowna and I found a little clock tower..
Valemount, BC
We stayed at a Super 8 motel here run by a friendly Indian couple. It was super clean too. There’s a little seating area and fireplace in the lobby with (if I recall) Elk racks on the walls. You feel as if you’re about to embark on some grand hunting expedition.
Valemount is a perfect launching-off spot if you want to head into Alberta and check out Jasper National Park.
Jasper National Park, Alberta.
Even with all the smoke, we were riveted by this glorious National treasure. Think of Yellowstone on Steroids. Nah, it doesn’t even come close with these towering peaks!
Dawson Creek, British Columbia.
This is where the famous Alaska Highway begins … ALCAN HIGHWAY.
Northern Rockies Lodge, British Columbia
I can’t find adequate words to capture this spot. Northern Rockies Lodge was, by far, one of the best experiences of our trip. It was the quintessential mountain lodge made of hewn logs, hidden inside the northern-central region of British Columbia–AWAY FROM EVERYTHING. You even get a Canadian cowboy strumming a guitar in the middle of the dining area singing country tunes.
Our Lodge on Muncho Lake. They offer little float plane rides into the mountainous scenery for $250 a person.
I highly recommend this place if you ever happen to be in the tip-top North of British Columbia (in the summertime, of course). You’ll go through some stunning mountain territory just to get to the lodge. Then, you’ll be ready for an Alpine dinner! Wait…I feel like I’m in Switzerland.
We even came across a mama and baby moose in the middle of the road. If you take a moment and squint, you can see the moose in my very professional video here. I didn’t want to get out of the vehicle. Moose are 1000 lb animals and they can charge. My husband was driving the car in front of us.
The scenery in the Northern region of BC is terribly dramatic. I want to go camping here someday.
NORTHERN BRITISH COLUMBIA. MUNCHO LAKE.
Dad making a wild buffalo angry. Wilderness in Northern BC
My Video: I’m walking towards these mountain goats/sheep?
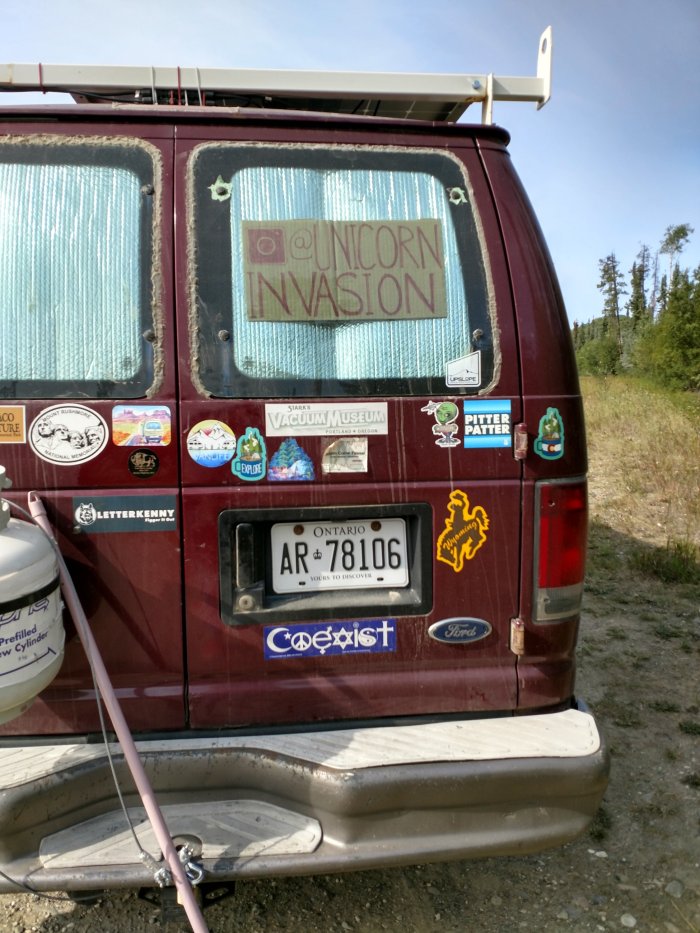
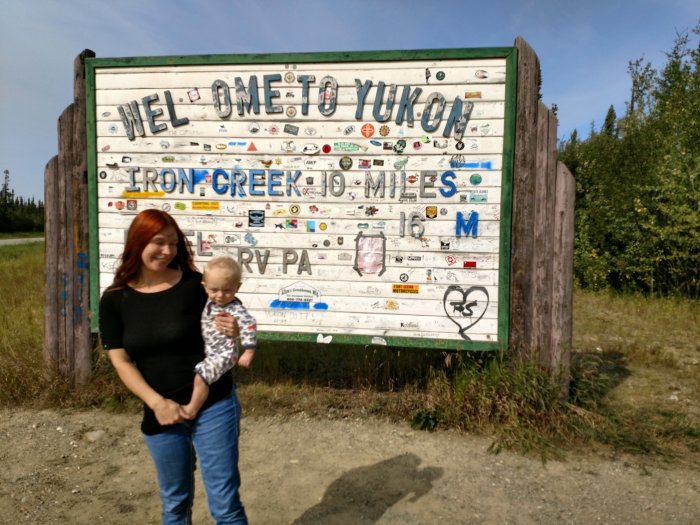
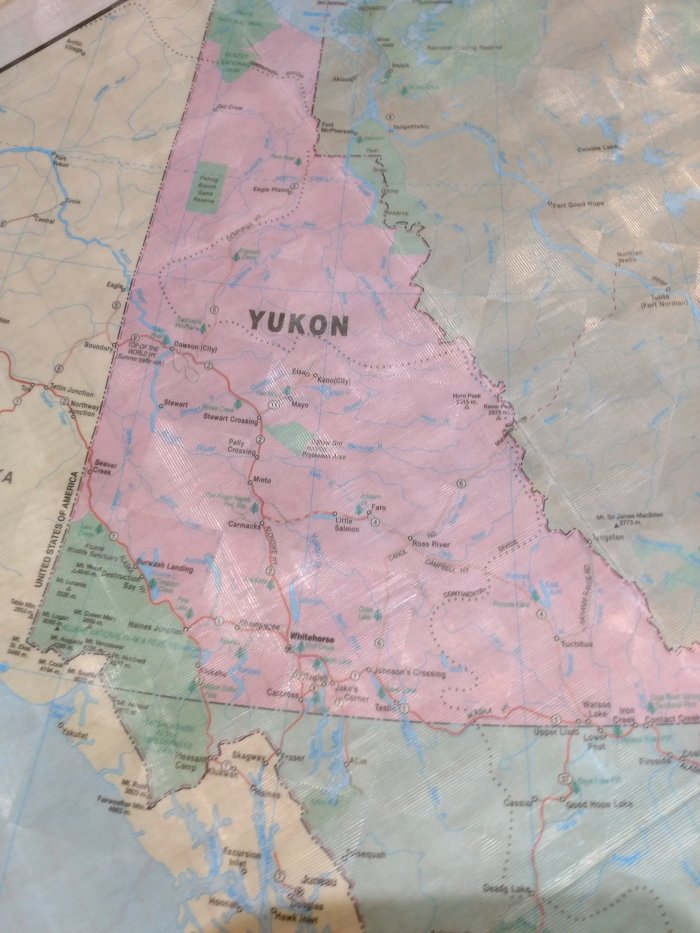
Yukon Territory
This place is weird but truly amazing! We were accosted by people dressed up like unicorns at the Yukon border. This never happens.
You gotta check out the visitor center once you get into the Yukon. My little baby boy was happy to be with Grandma!
Ahh, the splendor of the Yukon territory. Crisp, pristine and unspoiled by annoying campers. It unfolded in all its glory for us to see. If you want to get away from tons of campers and hikers (and actually enjoy the scenery) the Yukon summons you.
MY DAD LEFT ME STRANDED IN THE YUKON WITH NO CELLULAR RECEPTION
I WAS BUSY TAKING SELFIES OUTSIDE OF OUR CAR AND MY DAD (also taking pics on the other side of the road) HOPPED BACK INTO THE CAR AND TOOK OFF WITHOUT ME! I WAS LEFT STRANDED IN THE MIDDLE OF THE YUKON BY MYSELF WITH NO INTERNET OR CELLULAR/PHONE connection.
All I can remember is watching my Dad hop back into the vehicle and floor it down the road. “WAAAAAAAAIIIIIIIIIITTTTTTT! DAAAAAAAAAAAAD! DON’T GO! I’M STILL HERE! If you were a bear you could hear me screaming in the middle of the road as he left me in the dust. No one anywhere. No towns for miles. Cars almost never passing. Nothing. Just brutal, beautiful nature. Oh, and there are TONS of wild animals here!
Fortunately my Dad noticed I wasn’t in the car about 45 minutes later (He thought I had fallen asleep in the back seat) and turned back around. This was a very memorable experience.
Whitehorse, Yukon
I can’t stop raving about this place. This is one of the most awesome spots on the planet. The Yukon river flows swiftly beside the city of Whitehorse. There is a quaint little downtown with great restaurants. There’s even a rainbow colored crosswalk for all of you LGBTQ folk. We found a cool Totem pole here–picture below.
I encountered a white Canadian Photography couple who were taking photos of a native Canadian man, carving a moose (or elk?) rack. When I asked if I could take a picture of him carving the rack too, they all three stared at me in disbelief.
“Where are you from?” the white man asked. “I’m from Bend (Oregon).” “Where are you from?” I asked back. “Well, we’re from Yellowknife (Northwest Territories).” And it ended like that. Go figure. They’ve probably got more street cred than I do.
In the summer, the sun seems to shine brightly with tons of blue sky. The air is so refreshing here that you’ll be instantly purged of toxins. The mountains that surround Whitehorse are at your fingertips offering trails galore. If you hate the cloying heat in the lower/middle parts of the globe during summertime but enjoy the sun…the bright light….this place is just for you!
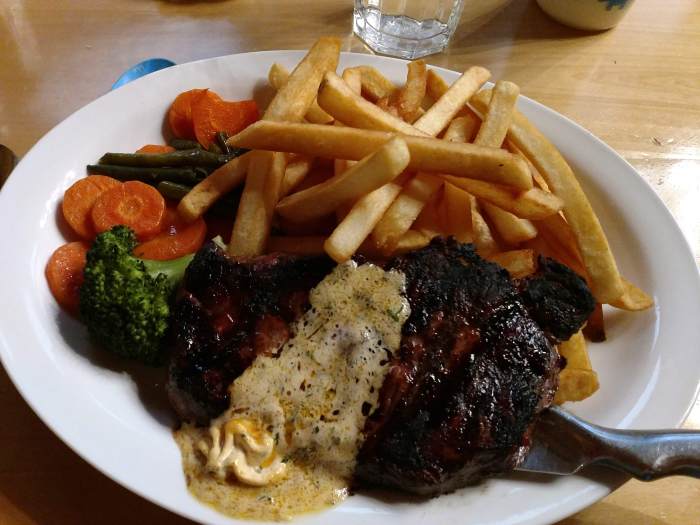
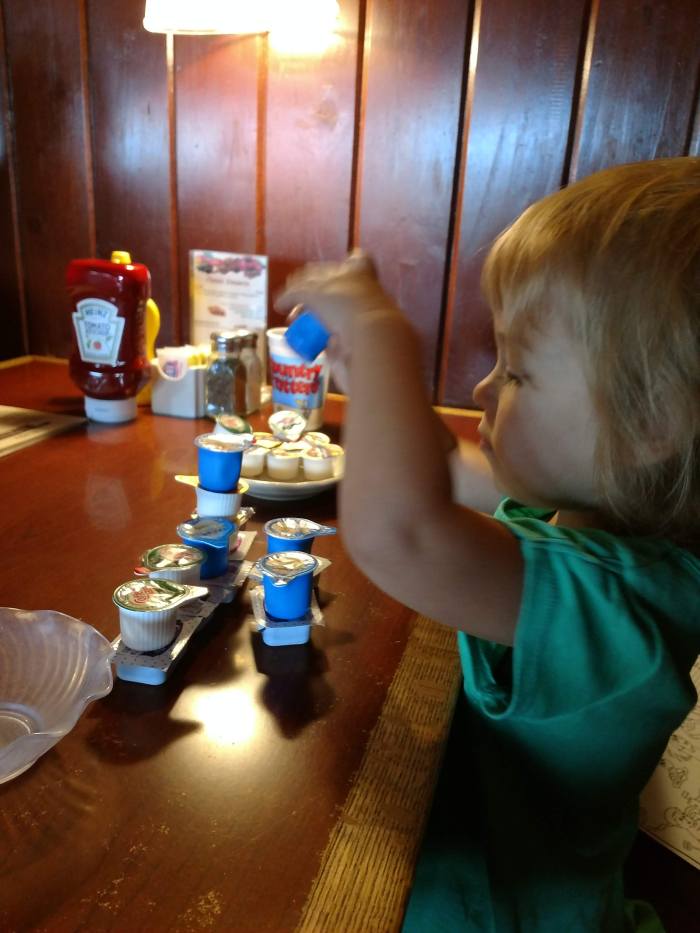
Tok, Alaska.
Clementine stacking the creamer containers while waiting for food at Fast Eddy’s. (Paradoxically, you’ll wait for a long time to get your food here.)
The last part of the drive!
We ended our trip in Anchorage, Alaska. To find out more, please keep following my blog!
I love blogging. It hits the spot. It’s like my little punch of dopamine. Some play video games; I try and weave a blog post together. And neither of us will judge the other, okay? It pulls me out of the daily monotony and displaces time doing physical labor–something I’ve grown to DESPISE. Unloading dishwasher…diaper changing…folding clothes….putting things away constantly….cleaning out the car…cleaning up after meals….grocery shopping….weeding the front flower bed….putting things away….picking things up….bathtime….getting up throughout the night (for almost 3 years now) to feed screaming babies….and never enough rest or time to do the things I desire to do.
Someday people will look back at our current time and instead of saying “There’s an app for that”, they’ll be saying “There’s a robot for that.” Imagine how much more free time future people will have for video games and surfing the internet while ignoring 3-D humans by enslaving semi-humanoids/Robots? Bonus, we won’t need to go to college either. There will probably be some way of downloading information straight into our brains…perhaps some attachment device to our brains so specific kinds of knowledge integrates and adds to our own minds! Why bother studying when you can just BECOME MORE AWARE, MORE knowledgeable with just the press of a button? BYE BYE AlZHEIMERS, BYE BYE Double Digit IQ.
Today has been hot. HOT. I think it’s 102 degrees and we don’t have an air conditioner. Instead of enjoy the balmy 87 degree house temp, I thought getting out and hitting some air conditioned stores would be best.
We began with Tuesday morning Storytime at the library. If you live anywhere near Bend (Oregon) you can appreciate all the FREE CHILDREN’S ACTIVITIES here! Summertime is dense with activities, everything from parks galore to free lunches, free crafts and games with terrific staff. There’s also free music (but not free food) at Drake Park on Thursday evenings. Don’t forget Farmer’s Market downtown on Wednesdays!
MY CHILDREN AT TUESDAY MORNING LIBRARY STORYTIME
After Storytime, we headed over to Target to try a SALTED CREAM COLD FOAM BREW offered by Starbucks. WHAT A SUPRISING CONCOCTION! Delectably creamy, deeply-brewed with a tingle of salty aftermath. If you don’t mind a bit of salty flavor, you’ll really enjoy this drink! My daughter also requested her first CAKE POP upon spotting a row inside the glass pastry shelf. In case you needed to know, we actually went to Target to purchase baby food and my daughter’s first set of underpants. Milestones are underway.
I WANT SALTED CREAM COLD BREW COFFEE MAMA! PLEEEEEEASE!!!
Trying her very first CAKE POP! What an irony for such a hot day.
We also spent a chunk of the hot day at Cline Falls State Park. This is a very beautiful region in central Oregon near Redmond–like the quintessential ‘oasis in the desert’.You’ll see the usual scrubby evergreen trees and earthy terrain and suddenly you’ll spot the river and it’s grassy green banks. It will settle your soul, akin to taking a deep breath on a hot, parched afternoon.
Since I had little one’s we didn’t make it to the Falls section, but we did find multiple “beach spots” to play along a calm section of the river. I highly recommend it here–especially for little ones. There are so many gentle wading areas and deeper, yet easy flowing areas for a nice float. There are plenty of picnic tables too! Just make sure to go on a weekday and earlier in the day too. You’ll easily find a spot to enjoy the river. We found some nice companions there who offered us freshly picked cherries.
This week has been one heck of a ride. Lot’s to be excited about and lots of future adventures on the horizon that I’ll be blogging about. I’ve been doing some “copying” lately with regards to recipes and, well, famous paintings. Learn from the best right? Sometimes creativity is playing around with other people’s ideas–make sure and give them ALL THE CREDIT, of course.
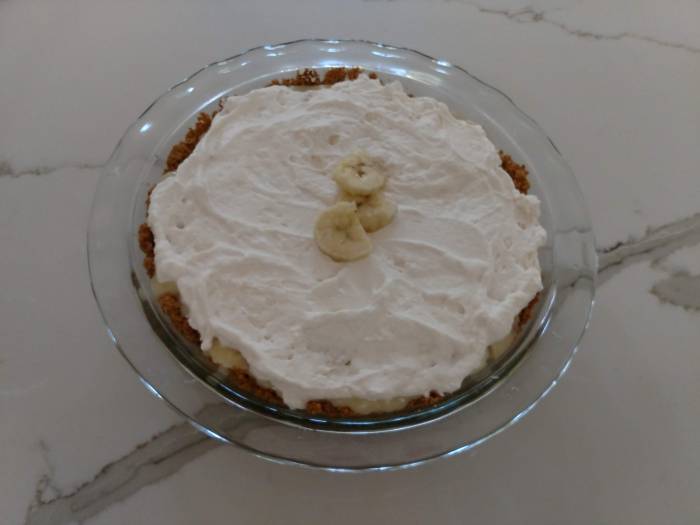
Another thing…I failed at a scratch banana cream pie. I noticed that I had extra whip cream and some bananas (about to go bad), so why not attempt it? It turns out that cooking custard and getting a desirable consistency is something only genius cooks with arcane culinary and mathematical skills can master.
Here is my pie. But I won’t ruin your moment and display the runny, slushy middle. It tasted AMAZING. Impeccable freshness with a deliciously thick homemade graham cracker crust. However, the consistency of the filling was WAAAY off–even after allowing it to set for 6 hours uncovered in the fridge.
Making a “firm enough” custard filling is one of those precarious situations. You better not undercook or overcook it and it has to be done accurately within 5-7 minutes on your stovetop. You have to stir rapidly during the boiling process (no distractions or multi-tasking). Oh, and don’t let your custard brown on the bottom of the pan during your 5-7 minute boil. It’s very difficult to achieve a decent result because the parameters are so strict. Don’t accidentally scramble the eggs either–you’ll get lumps.
I don’t want any liability or litigation, so I won’t be posting this banana cream pie recipe here. I will give the taste of this pie an A+ but the consistency an F–it was very creamy (no lumps) but it just wasn’t firm enough. My daughter keeps asking for more–so we’ll be eating it over the next couple days.
After my pie failure, I decided to go for something easier. How about cold brewed coffee? I had been skimming over the Pioneer Woman’s cookbook and noticed her recipe. I basically followed her General Plan for iced coffee.
I used a very dark coffee bean (Rwandan Coffee beans) and ground them up. Then I scooped 3 large cups of my freshly ground coffee and dumped them into a glass bowl.
Next, I poured 6 cups of COLD water over the coffee grounds and gave it a quick mix with a spoon. Finally, I covered it in plastic wrap, set it on the counter top and let it brew for over 12 hours.
Once the 12 hours were up, I found a bigger glass bowl, a sieve and some paper towels. I strained the ground coffee mixture through the sieve and about 2-5 layers of paper towels (yes, this will take a bit of patience but I promise it works as a PERFECT FILTER and I didn’t get a single stray coffee ground in my final brew!
I poured the cold brewed coffee into a juice dispenser and let it chill in the fridge over night. My only regret is that I didn’t make enough!
Let me tell you, this is the BEST CHILLED/ICED/COLD-BREW COFFEE I’VE EVER TASTED!
Just fill a glass with ice cubes, decant your brewed coffee into the icy mix and dribble in some half and half and a spoonful of sugar (or don’t). Either way, its just luscious!
I thought that the dark roast would be too-overpowering, but it wasn’t at all. It just tasted rich…deeply flavored even after a splash of half and half.
Another thing that I’ve been doing this past month is trying to paint, “The Yellow Christ” by Paul Gauguin. The Yellow Christ has always been one of my favorite paintings of all time. I just find the color scheme breathtakingly original. Gauguin is definitely one of my favorite painters–one of his paintings sold for 300 million in 2015–just to give you some perspective of his classic popularity and talent.
Here is my version:
We’re also working on another acrylic painting (this one, 100% my own idea) with my little painting helper beside me!
I apologize if my brownie blog post conjures up feelings of oppression or triggers anxiety. I’m happy for you if you’ve already mastered the astute skill of boxed brownie making and I’m not sure I can offer anything in this post.
This post is actually for ME! Because I’m incompetent when it comes to brownie-making. I’m posting it here so that I can refer to it for my future brownie-baking endeavors.
I’m 37 years old. I’ve never, ever made decent brownies to save a squirrel. I’ve tried baking them from scratch. I’ve tried making every possible boxed brownie mix I could find but never any success. NEVER.
Like many, my problem isn’t with flavor (who can’t add a few marshmallows, chocolate chips, nuts or whatever–as if that’s brilliant?). My failure has always been with texture…consistency…how they swim and melt on my palate. In the end, the brilliance is in the baking.
I always make brownies either A. Undercooked or B. So hard and tough that you feel like you’re eating beef jerky.
THE TWO THINGS I LEARNED ABOUT MAKING BOXED BROWNIES?
Over the past few months I’ve been doing some brownie research. Why does this ALWAYS happen to me? I’ve discovered that there are a couple reasons.
The first thing that I kept coming across was that in order to achieve a chewy, gooey texture with adequate density and thickness (but still baked properly) you need to make a double batch (2 boxes of brownie mix) and bake in a 9×13 aluminum pan!
The second thing is to mix the wet ingredients separately, add them to the dry ingredients, and let your mixer swirl the ingredients for just a few seconds–just until they are imperfectly wet and mixed. If you beat the ingredients too long, your brownie batter develops air pockets and makes the texture more like a cake than a brownie.
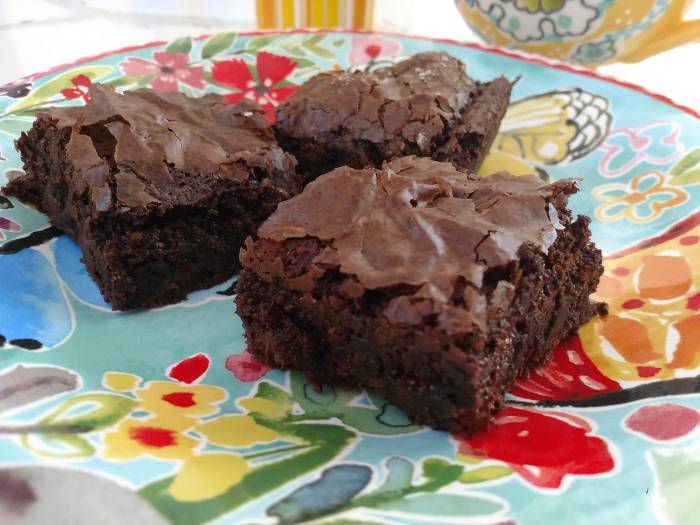
Today I finally made brownies that tasted delicious, but even better–had the correct “brownie-texture” once I followed these simple rules:
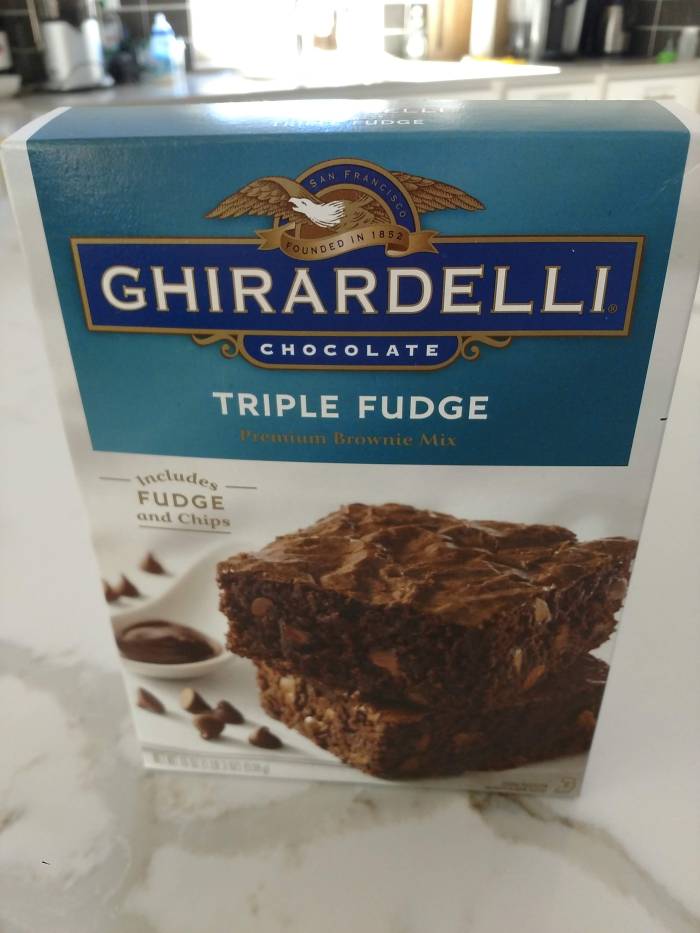
Use 2 boxes of brownie mix. I used this one:
2. Double all your ingredients as per your box (obviously, you’re using 2 boxes).
3. Mix the wet ingredients separately and completely.
4. Add wet ingredients to dry ingredients and beat with mixer just until mixed.
5. Smear a decent layer of vegetable oil all over a 9×13 aluminum pan.
6. Pour brownie batter into super greasy pan.
7. Heat oven to 325 degrees.
8. Bake the brownies for 50-53 minutes. I baked mine for 51 minutes and they turned out perfectly gooey inside with a crackly top.
8. Let your brownies cool (and continue to cook in pan) for over 1 hour after you pull them out of the oven. I cut mine after about 2.5 hours.
They are still gooey inside but sufficiently baked! This has been my struggle!! Finally I have a decent brownie plan for future brownie creations.
Now that I figured out how to make blog posts on my phone I can make content while I nurse my baby. But he’s super interactive with hands flailing the whole time. We will see if I can complete this post.
I’d like to blog 2-3 times each week if I could find the time– but for now, I’m staying committed to my 1x per week at least– no matter how bad or weird it is. Blogging is as much about getting into the groove as it is about thecontent.
To preface this post I’d like to be clear that I never really follow recipes, so I apologise for not being very decisive with the instructions. I just can’t get myself to do it– I feel like I’m locked in a straight jacket. Plus, l always learn something memorable when I make a mistake.
Today I woke up to find our 1 cereal box was almost empty. While disappointing, it wasn’t tragic.
I realized that I had a variety of on-hand items that might be concocted into granola.
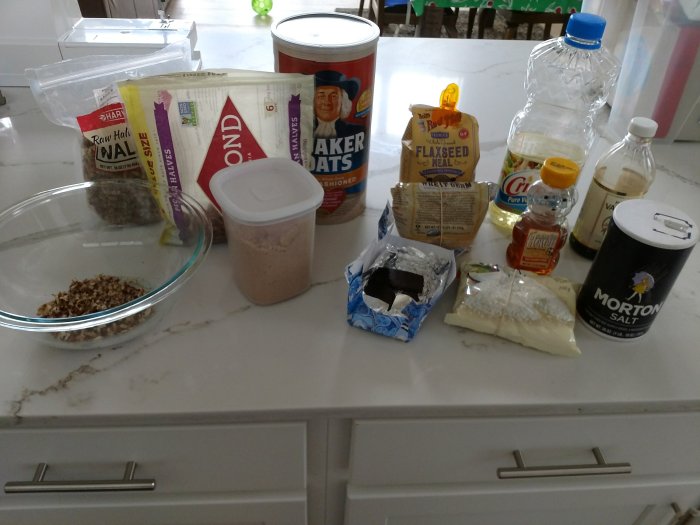
Things like: oatmeal, shaved coconut, pecans, walnuts, dark chocolate, flax seed meal and wheat germ. Honestly, these were all I had. My raisins had been depleted a couple weeks ago and I didn’t have any dried cranberries or pumpkin seeds that so many recipes suggest. Oh well. I had enough items to make it work. A practical point in being creative, for me, is figuring out strategies to use what l already have– for as little money (and as few trips to the store) as possible.
The main thing you need to make granola is oatmeal. I found some random items here:
Recipe:
3 cups oatmeal
chopped walnuts (3/4 cup more or less)
chopped pecans (3/4 cup more or less)
Coconut flakes (I used 1/2 to 3/4 cup)
1/2 cup flax seed meal
1/2 cup wheat germ
Brown sugar (to your preference)
Broken up dark chocolate bar (or chips or whatever you have)
Dollop of honey
Splash of vanilla
1/2 tsp salt
1/4- 1/2 cup vegetable oil
300 degree oven and bake for 10 minutes? Or whatever. Just don’t burn it.
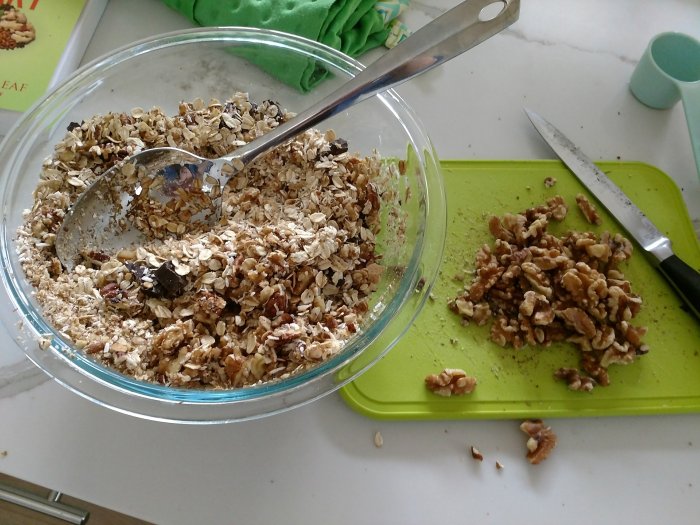
Mix everything up:
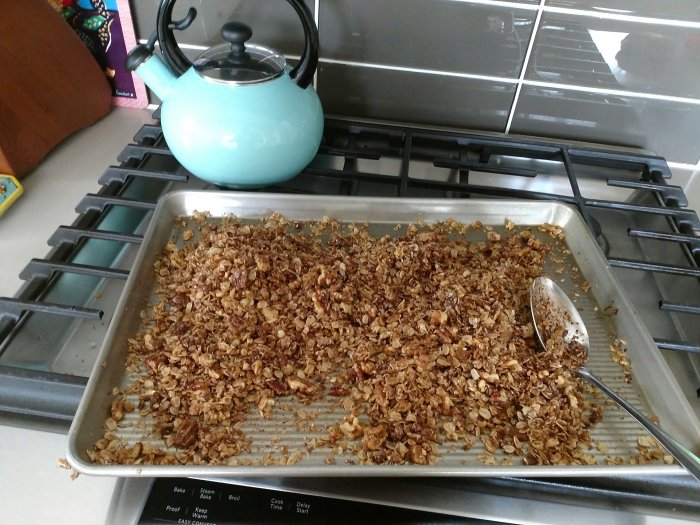
Spread on cookie sheet:
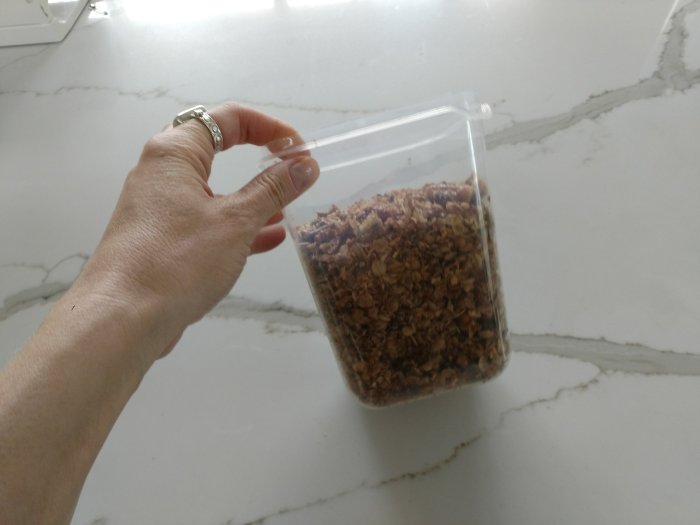
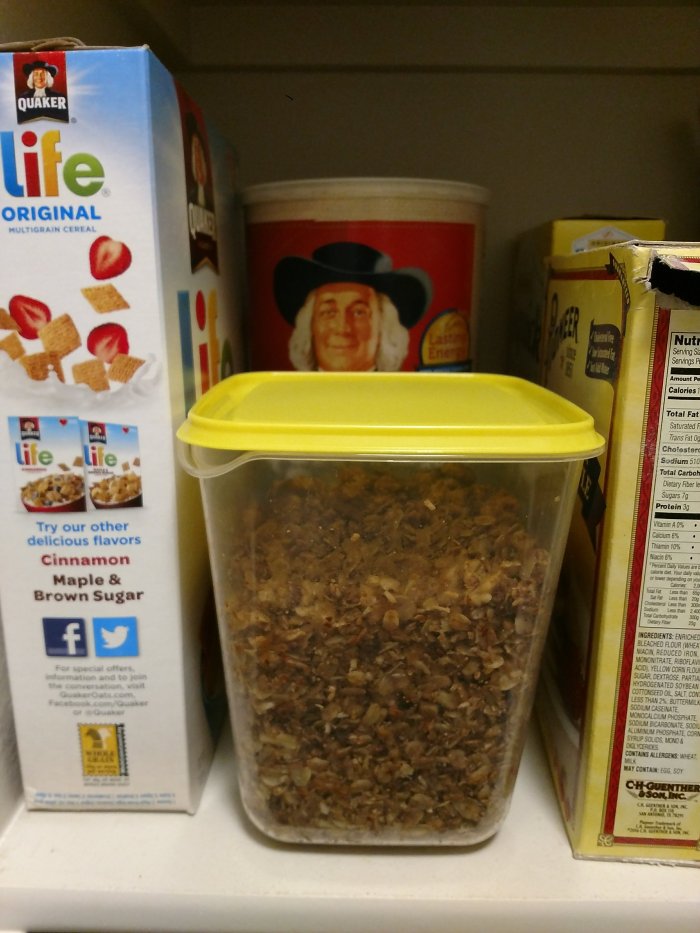
And store your freshly baked granola in an airtight container.
It tasted delicious! Now to store by in the pantry. 😀
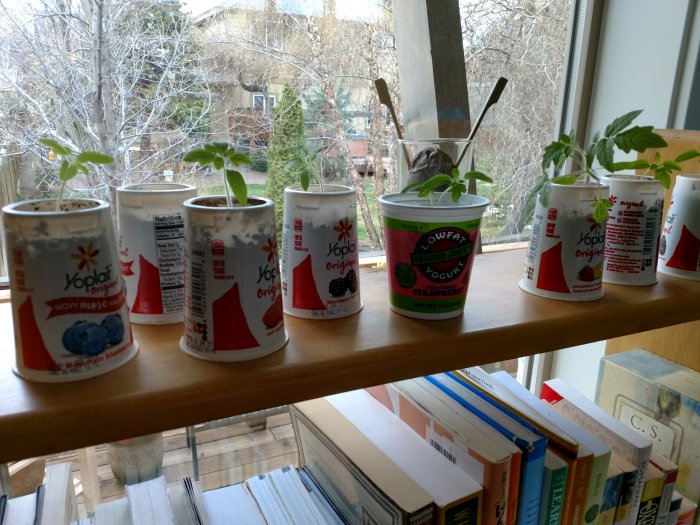
In other good news? Guess what? Our tomato plants that we planted from seeds are finally growing! You probably remember this blog post: Greenhouse where we planted them.
Well here they are. Tiny tomato plants finally popping out of yogurt containers. They’re growing!
Fertility festivals are now being celebrated throughout the northern hemisphere so why not throw your own spring party?! I decided we should welcome spring. You know how that goes. This time I decided not to go “full pagan” but instead, decided to whip up a cake from scratch in the shape of an egg and throw a little tea party for the kids. Still too pagan for your religious preferences? Well next year we’ll be making cake crosses to celebrate Easter. This cake was my first (decent) 100% scratch cake. We even made a couple crafts to celebrate the season.
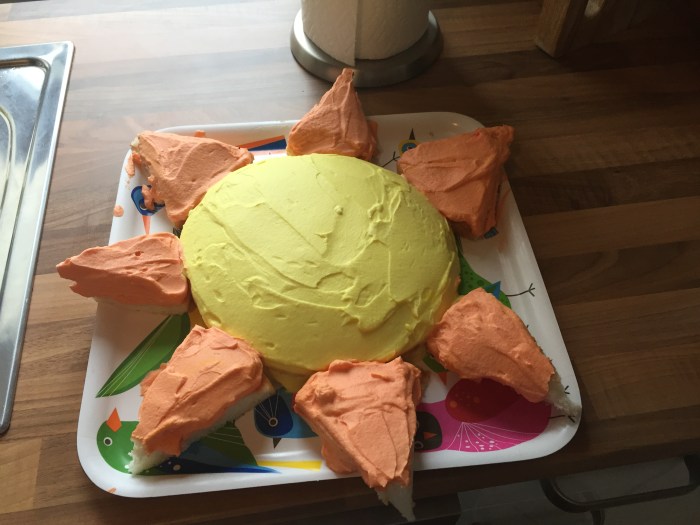
Yes. I did try and make a cake from scratch before. Once. For my husband’s birthday. I told him I was going to make him a Sunshine cake. He thought it was a cute idea but was in for a terrible surprise. And it was a disgrace to mankind.
MY CAKE DISASTERPIECE of 2016. PICTURED HERE FOR YOUR VIEWING PLEASURE:
So, as you can tell, my cake baking skills have improved a bit. I’m just slightly proud of this little beauty– mostly because I thought up the idea, the colors and the name of this cake when I was playing around with the frosting color.
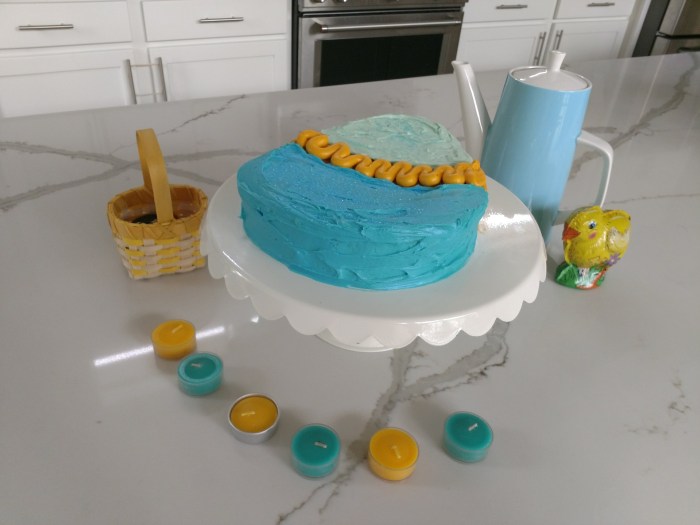
My “Robin’s (Easter) Egg Cake” 🙂
NOW HOW DID I DO THAT? Here are some pics (and I’ll post the link to the cake recipe below). What a fun way to usher in the springtime than a splash of Robin’s Egg blue on your Easter eggs–or, in this case, cake?
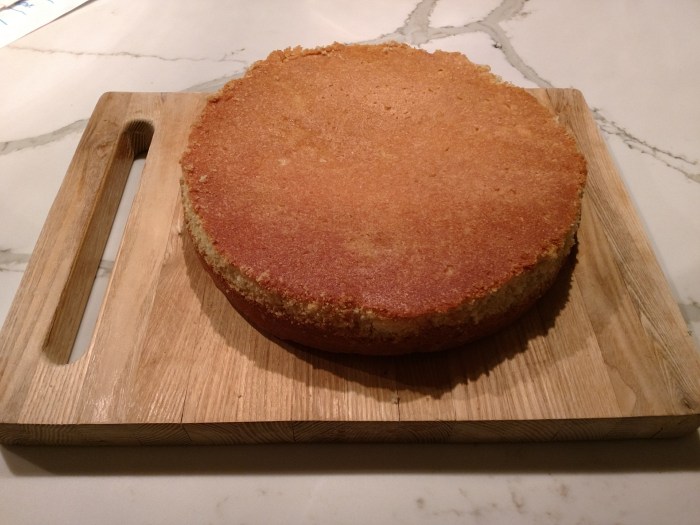
Once I baked the cake, I removed it from the pan and flipped it over (sometimes the top of the cake is caved in a bit or dimply). ALWAYS FLIP YOUR CAKE OVER IF YOU’RE AN INEXPERIENCED BAKER LIKE MYSELF. The bottom is just so perfectly flat and ideal for frosting. My cake looked like this: caramelly sweet, dense, moist and just delicious!
After the cake cooled, I wrapped it in plastic wrap and let it sit over night. NOW THAT IS THE TRICK TO FROSTING A CAKE! If you do this, you are much less likely to smear crumbles of the cake into your frosting during the frosting procedure. Do you know what I’m referring to?
Then I cut an egg shape out of “cereal box” cardboard to use as my template for cutting the cake. Yes, I salvage all my cereal box cardboard for a variety of uses 🙂
I cut the “egg shape” of the cake the following morning:
I made my frosting and prepared several bowls for experimenting with colors to use.
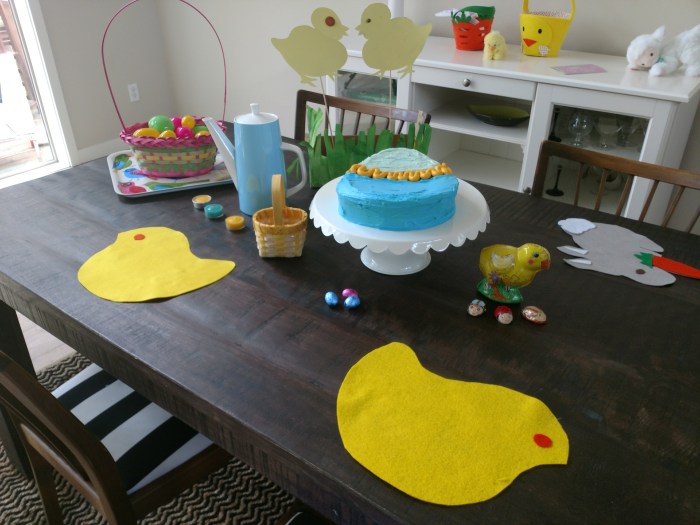
Voila! Our vernal celebration.
I also thought-up these little chick and bunny rabbit placemats from some scraps of felt I had laying around. Just use a template that you have on hand (I used a chick plate–sorry, breakfast remnants still stuck-on) and a hot glue gun to seal on eyes and other features like cotton tails and carrots. SUPER FUN! I will be using these for next years spring décor too.
Here is the cake recipe link (the only thing I did differently was use 4 eggs instead of 5, bake for 35 minutes instead of 25 and I substituted whip cream for buttermilk–only because I didn’t have any on hand). The cake tasted delicious!
Also, did you notice the chicks standing in the grass in one of the previous pics? That was one of my “dumb creations”. Just make cute chick cut-out’s from your old cereal boxes, paint them yellow, glue to skewers and prop them up in a box